Configure UniFi Network to export selected system logs as CEF to a remote syslog or SIEM server, then verify that the receiver gets usable events.
UniFi can send selected system-log categories to an external syslog or SIEM endpoint. The practical setup is short: point UniFi at a reachable receiver, select only the categories you need, and verify a real event at the destination. UniFi exports these system logs in Common Event Format (CEF), so choose a receiver and parser path that preserves the original payload until you have validated the fields.[1]
This guide covers UniFi Network’s System Logging / SIEM export, not a generic replacement for every device-local syslog message. The available labels and navigation can vary with the UniFi Network version; use the equivalent System Logging or SIEM integration page in your console.
What you need
- A UniFi Network administrator account.
- The IP address or resolvable hostname and listening port of a reachable remote syslog or SIEM server.
- Network and host firewall rules that allow the UniFi gateway to reach that listener.
- A test plan: make one harmless, observable change or select a known log event after saving the configuration.
Do not expose a syslog listener directly to the internet. Place it on a management or logging network, restrict inbound access to known senders, and treat exported events as potentially sensitive operational data.
1. Decide what belongs in the export
UniFi’s system logs cover operational, internet, power, security, and system activity; the documentation lists examples such as client roaming, WAN failover, firewall blocks, device adoption, and administrator changes.[1]
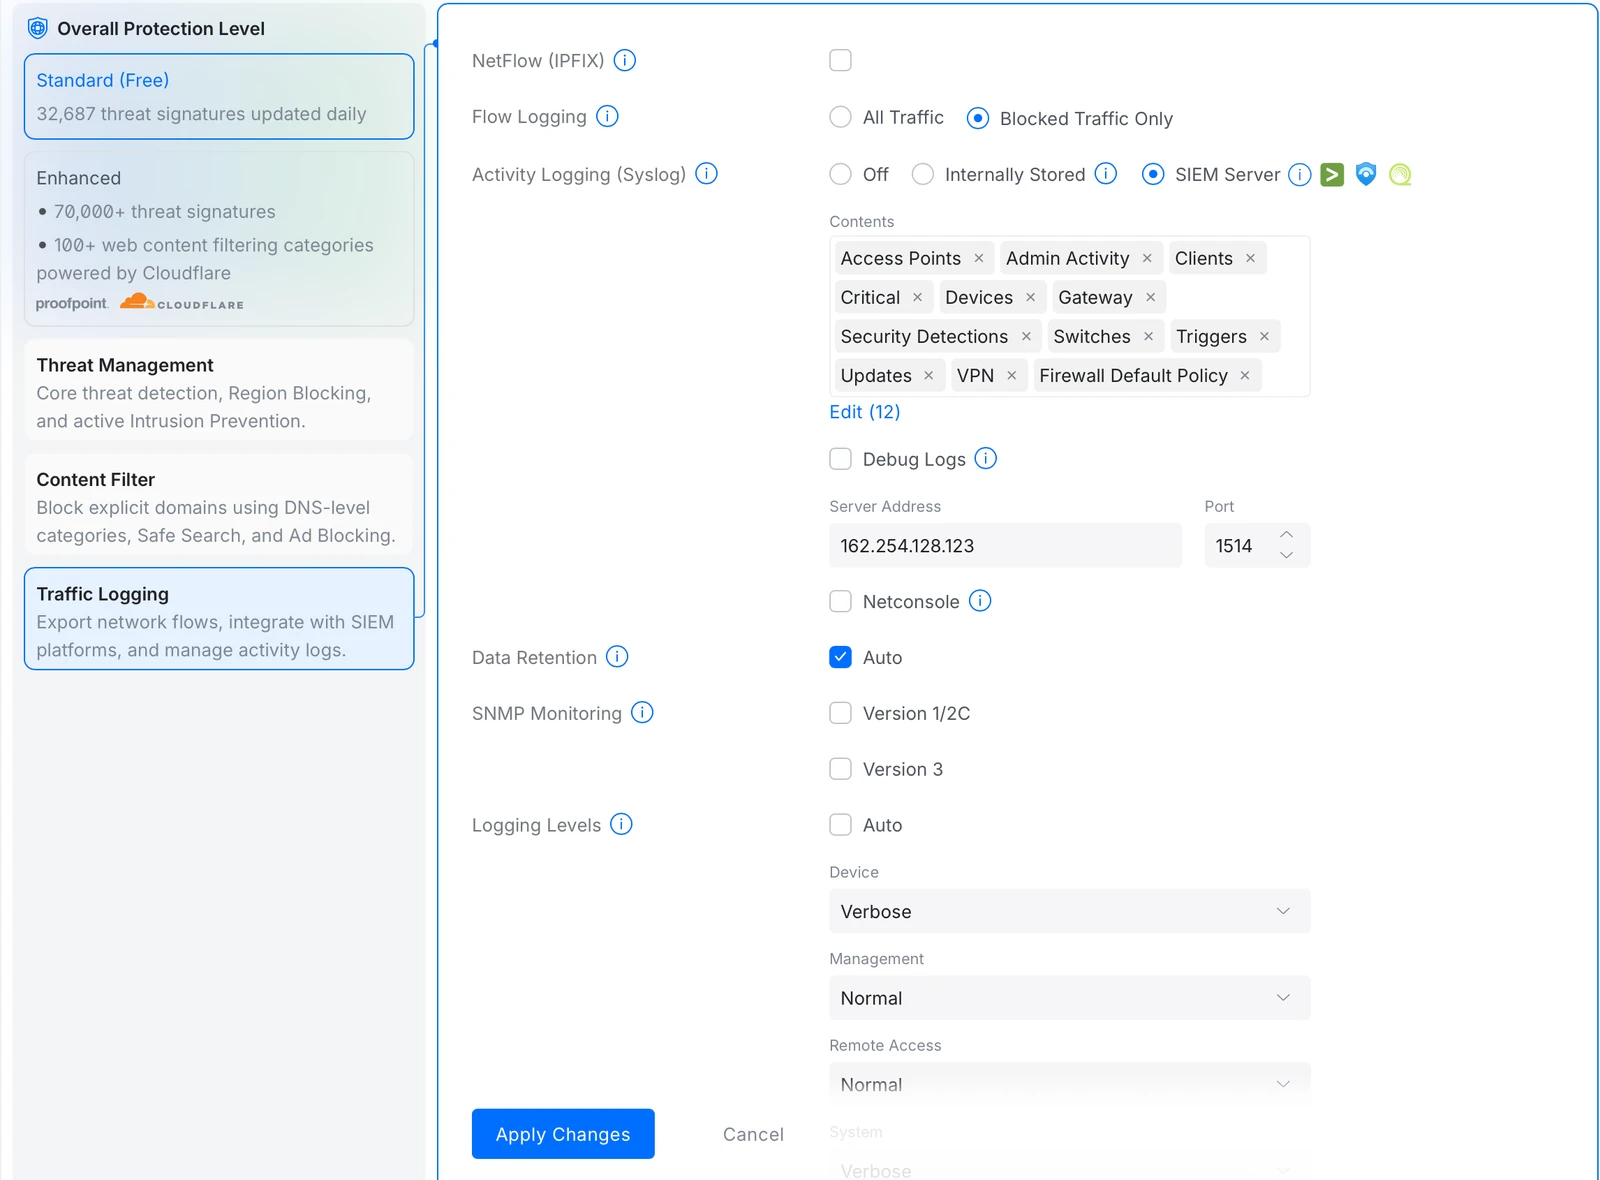
For the UniFi parser and the companion dashboards, select all available Contents on the current Dream Machine interface. The available list shown in the current interface contains 12 selections:
- Access Points
- Admin Activity
- Clients
- Critical
- Devices
- Gateway
- Security Detections
- Switches
- Triggers
- Updates
- VPN
- Firewall Default Policy
Selecting all 12 gives the parser and dashboards the broadest event coverage. If you intentionally need to limit exported data, document the omitted Contents and expect related dashboard widgets to have gaps.
2. Configure the UniFi destination
In the current UniFi Dream Machine Network interface, open Network → CyberSecure → Traffic Logging. Under Activity Logging (Syslog), select SIEM Server. Then:
- Click Edit Selections and select the log contents from the previous step.
- Enter the remote receiver’s Server Address and Port.
- Save or apply the configuration.
Ubiquiti’s documentation refers to the equivalent workflow as Integration → System Logging / SIEM; the menu labels have changed in the current Dream Machine interface. The export payloads use CEF.[1]
Record the chosen address, port, categories, and the intended data owner. This prevents a common incident-response problem later: nobody knows which appliance is sending which telemetry to a shared listener.
3. Confirm the receiver is actually listening
Before troubleshooting UniFi, validate the receiver:
- Confirm the process is bound to the configured address and port.
- Confirm its host firewall permits inbound traffic from the UniFi gateway or console.
- If the receiver is a LogScale Collector, confirm the matching
syslogsource is assigned to the intended sink and repository. See Build a Multi-Repository Syslog Server with LogScale Collector.
If the receiving service uses a non-privileged port such as 1514, use exactly that port in UniFi. A port mismatch is more likely than a parser problem during first setup.
4. Generate a safe test event
After saving the export configuration, trigger an event that is safe in your environment. Examples include a controlled administrator sign-in, a documented configuration change, or a short client connection test. Do not weaken firewall rules or create artificial security alerts merely to generate telemetry.
On the receiver, look first for the raw event rather than a fully parsed field. A CEF record begins with a header such as:
CEF:Version|Device Vendor|Device Product|Device Version|Device Event Class ID|Name|Severity|Extension
Ubiquiti documents this header structure and provides examples for administrator access and Wi-Fi-client disconnect events.[1]
A raw CEF event proves the network path and receiver are working. Parsing comes next.
5. Parse and use the data
For LogScale, use the UniFi Syslog Parser as the prerequisite for the UniFi dashboards. It is designed for UniFi Syslog events and its companion dashboards cover a basic operational overview, security and audit events, Wi-Fi quality, and gateway health:
Assign the parser in the repository’s ingest-token configuration, then send the matching collector source to that token’s repository. Keep an unparsed/raw view available during rollout so you can compare parser output with the received event.
Troubleshooting
Nothing arrives at the server
Check the destination address and port in UniFi, then the listener bind address and host firewall. Confirm that the device sending the traffic can route to the server’s logging network. Do not assume that a service bound only to 127.0.0.1 is reachable from UniFi.
The receiver gets events but no useful fields
First inspect the raw payload. Check whether it starts with CEF: and whether the assigned parser expects the received format. Ubiquiti states that System Logging / SIEM exports use CEF, so validate parser selection before changing the network path.[1]
The expected category is missing
Return to the UniFi export page and check the selected categories. Create a safe test that belongs clearly to that category, then compare the raw receiver output with the UniFi Logs view.
Next step
Once one UniFi event arrives and parses correctly, configure the Build a Multi-Repository Syslog Server with LogScale Collector so that each syslog listener can use the ingest token and repository intended for that data boundary.
Sources
[1] https://help.ui.com/hc/en-us/articles/33349041044119-UniFi-System-Logs-SIEM-Integration
Version history
By default each save after the first publish creates a new version. Drafts stay on v1. Overwrites update the current version in place. Open any version to view or download it.